Sunday, October 30, 2011

CAS-ual Fridays: CFC26

This is my entry for my very first challenge: the CASual Friday challenge #26! The sketch seemed simple enough but I feel a tad overwhelmed by all the talent in the gallery thus far! One foot in!


The card is made using a Lawn Fawn stamp set called My Silly Valentine. The lace ribbon is from a local haberdashery and the card from a regular office supply store. The circles were cut using two dies from the circle set of Spellbinders Nestabilities and the patterned paper is from a free paperpack from Issue 84 of Simply Cards & Papercraft (UK) called 'Picnic in the Park' by Serif. All images/sentiments have been stamped in Momento Tuxedo Black ink and coloured with Copic Markers.

If you'd like to check out what CASual Friday is about; have a look at the other cards on display or take part yourself: it's here!

Fawning over my new Stamps!

I need to get this off my chest. I do.

I... LOVE... LAWN FAWN STAMPS!!!

I didn't think I would fall so madly in love but hand in hand with my Copic markers- there was no turning back. They're so cutesy and sweet you'll need insulin. Kelly Marie Alvares is the goddess behind Lawn Fawn. I adore watching her videos because she just sounds as sweet as her stamp images! If you haven't already heard of Lawn Fawn (and you're a crafter)- smack yourself (not too hard! You need those creative brain cells!) and head on over here. At first I thought them a little expensive but these stamps are really good quality photo-polymer and stamp like a dream. Am I gushing? God, I so am.

These are some of the cards I made using the Cosy Christmas set and I think the other one is called Funny Valentine- or something like that.


A Shopping Tea Party

If anyone knows how to make good money; it would seem the prize goes to craft stores.

Papier Love: a local craft store at the Curve in Damansara had their annual members day in the form of a tea party. Think goodie bags, little canapes and sweets, lucky draws and of course, member discounts. The lucky draw was spread out- one for every hour so if you wanted to know if you've won; you have to be there all day. There is something terribly tempting about being in a hobby store. You all know the feeling. The pretty items calling you even though you know you shouldn't. Usually, if you're there a couple of minutes , it'd be easier to say, hey I'll think about this and off you go. But it's a completely different ballgame when you keep telling yourself- just awhile more- I may get lucky and win. But seriously Sweetie, what are the odds?

So I didn't win anything but still bought stuff. It's Papier= 1, Diana=0. Sometimes you know the odds are going to practically avalanche you but for some reason you like the taste of cold defeat. Nevermind, scrap materials are never a bad thing. Never.

How can stuff that make such lovely cards be evil? Hmmmm?


Although, I must admit- I do like the goodie bag! Many a goodie bag just come with ridiculous RM5 vouchers only valid for like RM100 purchases or crummy bookmarks. This bag however had some nice embellishments- chipboard and a metal frame as well as sparkly alphabet stickers. These things could easily cost RM50. Granted they're probably old stock and the stuff that didn't sell but I am sure I can make something lovely from it.


All in all it was a pretty good experience. I was hoping to make some new friends in the hobby but though people were generally nice and friendly they already seemed to have their own cliques and groups so it was harder to penetrate the circle. I think if I do want to get into the fold I'll need to attend some classes. I guess we'll see!

P.S. I caved and bought Martha Stewart punches. I promised myself I wouldn't. I hope I don't get mad at me for lying. :-p

Tuesday, October 25, 2011

A busy Bee...

It's been a busy cardmaking week that went past! A colleague liked my past Winnie the Pooh set and asked if one could be made for her. So I did a new set. It's not too much like the first one although the elements aren't really different. Cutesy Pooh stickers, matching patterned paper and embellishments. Seems to be a surefire recipe that hasn't failed yet!

The next card I made was a result of a video I was thinking of making. Watching my favourite crafters make youtube how-to videos made me want to do one of my own. But for a video I had to think up an easy yet clever card that could be done in the 9min time frame I got for the vid. It was whilst turning the wheels in my head to figure out how best to do that, that I came up with the idea for this: a vintage looking card with a cutesy image! From my new stash of Lawn Fawn stamps: this stamp is called Winter Bunny and it's too cute for words! LF is known for producing sugary sweet images so I thought a challenge would be to try to create a vintage looking card with this image. I don't know if I am succeeded really and I never did get around to making that video- but I love this card all the same!


Lastly is this 'sister' card for an earlier coffee card I made (reminisce: post 'A spot of Java to Get Well Soon')

Colour My World!

There seems to be only one colouring tool on earth currently that gives me printed looking results with minimal effort. Enter: the Copic Marker. So bloody expensive was this marker that I thought long and hard and eventually still purchased the cheapest range they had: the Copic Ciaos. This set of 36 features the 'A' range of colours (heck if I knew what that meant but I am guessing better start at A and work my way down the alphabet).

There are 3 types of Copics if you didn't already know: the regular, the Sketch and the Ciaos. Regular Copics come in square tubes with hard, marker-like edges but blend seamlessly for a professional finish. The Copic Sketch is a slightly elongated oval with two heads- one regular marker and the other a soft almost brushlike nib that actually feels like painting when you use it! The Copic Ciaos are a smaller version of the Sketch for *ahem* those of us on a budget. It does the same thing but comes in smaller tubes and thus need to be refilled more often. You can read more about Copics from their official website.

Copics are generally used by art students and comic artists so you can imagine how gorgeous it will look when wielded right. But in case you can't guess, here's a sample of what it can do:
And of course, a gorgeous wreath like that just aches to be part of card:

A colourful world it's going to be!

Friday, October 14, 2011

Another Round

Presenting a few more cards I made this week. It's been tiring and a bit of bumpy ride in my personal life but I find my cardmaking to be the solace I need after a rough day.

Been thinking about photography. Many people have been saying how much more beautiful my cards are in person so something must be wrong with the photographs. But the problem would be the dim lighting in all my rooms and the fact that I never get to craft when the sun is up. I've since bought a mini easel which helps hold the card and I've learnt the white background helps make things pop but lighting is still such a dampener.

Whats your secret to taking a good card picture?
Flowers for You

A Crimson Garden
Regal Regency

Monday, October 3, 2011

'By George She's Got it!' (I hope!)

Everytime I've made a card I've always had the distinct feeling that I wasn't quite 'getting it'. My cards were pleasant enough but as much as people complimented my work; I always felt like something was lacking. Something was keeping me from getting things just 'right'.

Today I made two cards that somehow didn't give me that feeling. I looked at them and I thought: By George I think I've got it. I know I've felt this before and then looked back and thought silly girl, you hadn't- not yet. So who knows, I may look at this a few months down the road- after all, we do learn every day we're on Earth!- but I am very proud of these two and the Goddess, may just be my best card to date.

1) Divinely Yours
Using a cut out from a patterned paper, I made this breathtaking card. The backing papers were stamped and distressed to give them the aged look. The flowers were heat embossed in gold and die-cut out using Sizzix cut and stamp packs that have become my newest love!


2) Vintage Christmas
This stamp set from Artistic Outpost features vintage Christmas images and was the reason I got into cardmaking in the first place! One of my first stamp sets (it came in a bundle with the Jane Austen one), I never did get around to using it until now. The backing paper actually comes from a Melissa Frances pack but I added the gold stamp for a little extra something. I love the red gauze ribbon too. It came with wired edges so it was a breeze to turn into ruffles.

Celebrating a Hobby!

October 1st marked the first World Cardmaking Day that I was a part of. I've not been in cardmaking a year yet and it has become such a huge part of my life. It's my therapy, my guilty pleasure and my pride.

I spent the day shopping for craft supplies and expanding my horizons in terms of what materials and tools I use. The cards I made were simple but I do hope you like them!

1) 'Take my letter to Santa!'
Love this cute stamp. Very simple card with an embossed background and a coloured in stamped image. Stamp from U-Mount Create-a-Scene Vintage Christmas by Sheena Douglass. The snowflakes have been heat embossed in silver. I am loving the Zing! Powders; so much less static cling issues as compared to the Ranger variety.


2) The Flower Tray
From Sheena Douglass' Wouldn't it Be Lovely stamp set and patterned paper from Prima's Londonderry pack.

3) Butteflies in the grass
Extremely simple card. Was a quick piece for an emergency card-requiring-occasion. Using stamps of life's Branches4Flowers stamp and a stamp set from NZ maker Flonz.


4) This was a commission for a colleague who had a funeral to attend. Again, using Branches4Flowers. This is fast becoming my favourite TSoL set!

5) Bubble Time!
This cute image came from a print pack from a Magazine I bought awhile ago but the name of which eludes me now! Thought the bubbles were just too cute. Quick and easy card but I know just who is going to get it. ;-)

The Cheaters guide to Cardmaking!

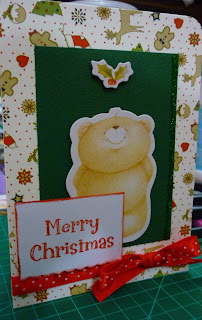
Okay, those of you who love using Crafts-U-print and similar cardmaking tools will probably want to bop me in the head for this post but here's my disclaimer- this is just how I felt when using this method! Like I was 'cheating' somehow. I know it's impossible NOT to use some kind of mechanical aid- even the idea of stamping as opposed to drawing and using a Big Shot as opposed to a scissors and embossing tool is probably cheating in some level too but this felt like I wasn't really using any creativity at all.

Why I would recommend it? It's fast and provides the glossy store bought look with minimal fuss or muss.

What I used:
- Papercraft Inspirations Christmas kit (Oct 2011; Issue 91)
- Glitter glue
- adhesives
- polka dot red ribbon

*In the pack you'll find a bunch of printed and scored card bases, decorating cardboard pieces and 3 mini acrylic stamps.

It's really as easy as 1-2-3.

1) Pick your base

2) Pick and glue your chosen cardboard pieces.

3) Embellish with a stamped sentiment (also part of the pack!) ribbon, glitter, buttons or whatever you have lying about. And you're done!